Firstly, wtf with only being able to post pics that are 700 px wide. Whatever.
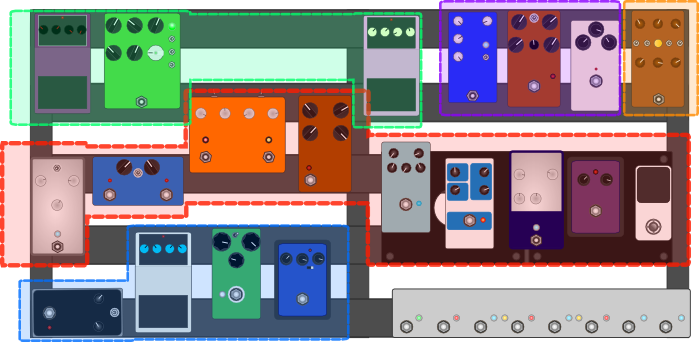
I have a scale diagram of my board that exists because
a) I hate rewiring my board. With a passion. Which means that I want to know where to put everything and how to route it before I sit down to do it.
b) This is what you do when you live in a tiny apartment and your wife and son are asleep - you listen to pedal demos with your headphones on and make stuff in Inkscape.
I made these two diagrams now (while my son is asleep, meaning I'm not busy playing with cars) to show how everything is connected.
- looper.png (57.47 KiB) Viewed 7002 times
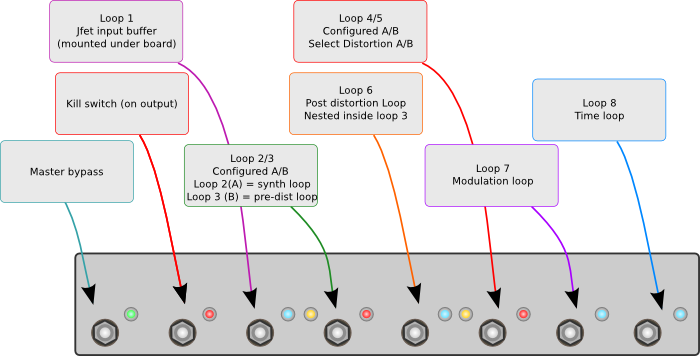
The looper is the key to the whole thing. It's the best part of the rig. Road Rage custom. They were awesome to work with.
The master bypass is a useful feature. If the looper or anything else fucks up I just bypass it and run straight to the amp. The output of the looper is connected to an opamp buffer under the board that is always on. I built it into a 1590b encolsure and put a couple of locking jacks on it, so that is my input/output interface.
Kill switch is there just in case and because I needed a 10 loop looper and had a switch over.
Loop 2 or 3 are always on in an A/B configuration. Loop 2 is my "synth loop", coloured red in the diagram below.
Loop 3 used to have a pre-dist EQ in it to tighten up the bass and goose the mids, but this was made redundant with the purchase of the Elements. Am currently building a green ringer and a couple of boosts into a 1590BB which will go in there, allowing it to goose any of the following fuzzes, without fucking up the synthy pedals.
The next loop is actually in the chain the 6th loop - it is a post-distortion loop. Again, it used to have an eq there to bring back the bass and tame some highs, but again the Elements made it redundant. Going to chuck something in there for stacking fun - considering DIYing a Zvex Machine, or maybe a fuck. Dunno. Unused at the moment, but when it is off the distortion is also off. So it's not only a post distortion loop, but a master for the fuzzes in the loops below.
Loop 4 and 5 are always on in an A/B configuration.
Loop 4 is my main sound fuzz - The Elements. Coloured orange in the diagram below.
Loop 5 is my alternative fuzz loop. The fuzzes are just arranged in series, allowing stacking or not. Coloured purple below.
Loop 7 is modulation fun.
Loop 8 is for delays and shit plus an Arc Flash at the end for good measure.
- loops.png (93.03 KiB) Viewed 7002 times
It's a really practical set up - I can pretty much select all of my sounds before each song and then steer everything with the looper. Nothing takes more than a couple of taps. It is kinda like a manual way of having midi presets for stuff, except that I actually understand this, and if anything goes wrong I've got shit loads of build in redundancy, and I can just solder it back together myself after the gig.
Will post a new pic in the spring once a few things arrive and I have time to make some new cables - been planning and saving and digesting some advice from PT-pro zen master Behndy (no I'm not going to etch everything, unfortunately).
As much as I fucking hate soldering cables, and rewiring my board, it's going to be a good spring...
Anyone got a demo of a Zvex machine
after fuzz?


")


")